第23章:API層は薄く② 入力→DTO→Handlerの流れを固定する🧩
この章はひとことで言うと👇 「どの機能を追加しても、毎回まったく同じ形で書けるテンプレを作る」 だよ〜!😺🧱
1) まず結論:Queryはこの順番が鉄板だよ🥇✨
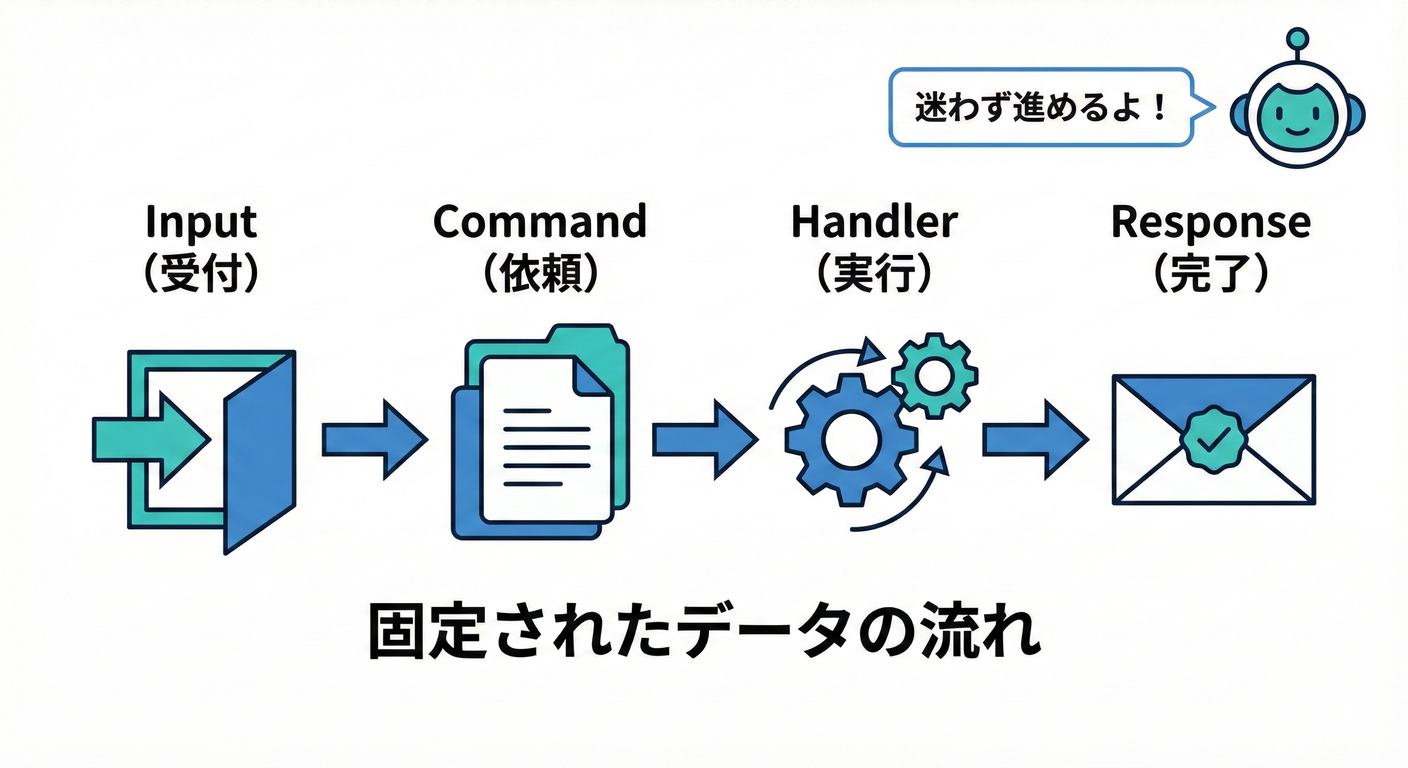
APIの中で“やること”を 4ステップ に固定します👇
- 入力を受け取る(APIのRequest DTO)📩
- Command/Query DTOに変換(アプリ層のメッセージ)🔁
- Handlerを呼ぶ(ユースケース実行)🍳
- 返す(APIのResponse DTO / HTTP結果)📤
これを守ると、APIが「受け取って渡すだけ」の係になって薄くなるよ🧼✨ Minimal APIでも、Controllerでも同じ考え方でOK! (Minimal APIのレスポンスの作り方・返せる型は公式ドキュメントにまとまってるよ)(Microsoft Learn)
2) 「DTOが3種類ある」って整理すると迷子にならない🧭📦
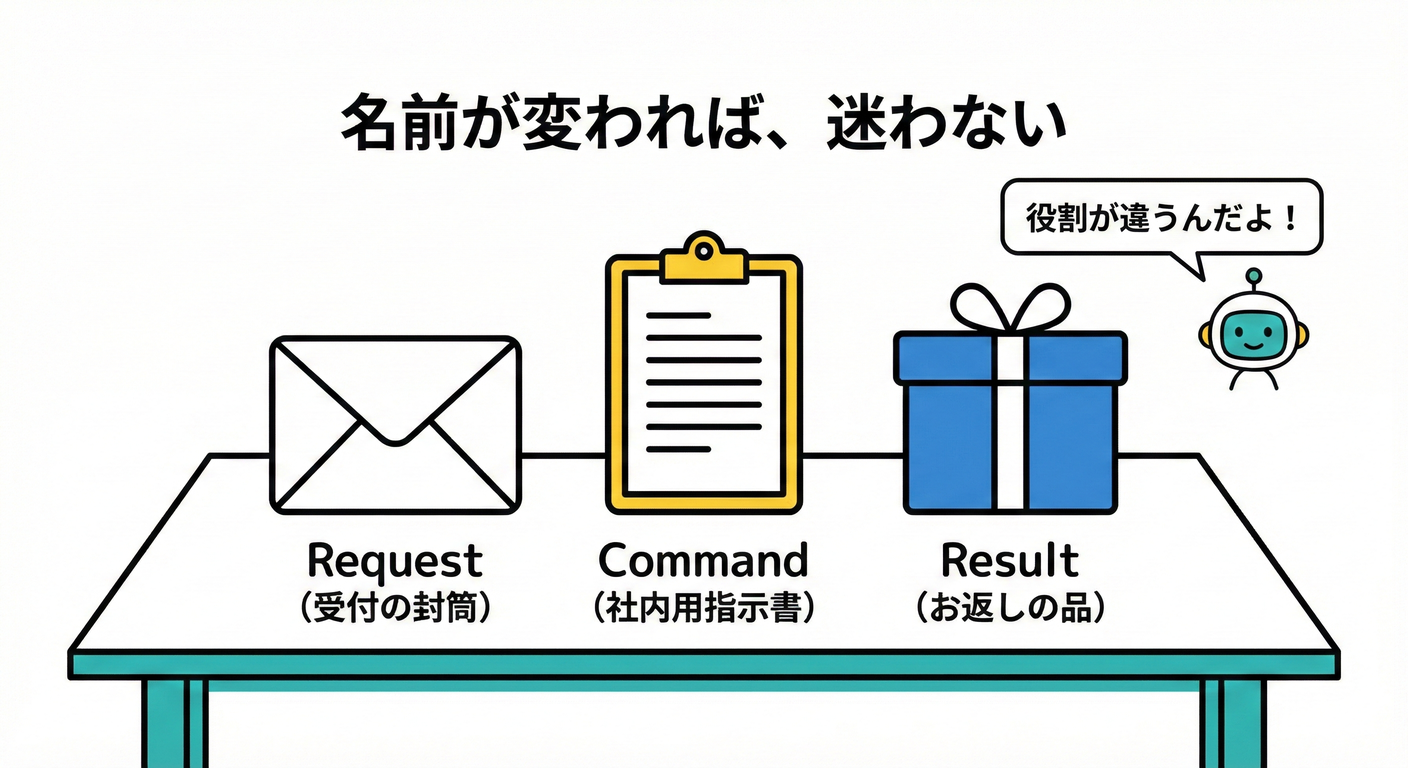
初心者が一番ハマるのはここ!😵💫 DTOを“役割で”分けると一気にスッキリするよ✨
✅ A. API Request/Response DTO(外向きの約束)📮
- 例:
CreateTodoRequest,TodoListItemResponse - 画面・API仕様に都合がいい形でOK
✅ B. Command/Query DTO(アプリ層の依頼書)📝
- 例:
CreateTodoCommand,GetTodoListQuery - ユースケースを実行するための材料だけ持つ
✅ C. Result(Handlerの戻り値)🎁
- 例:
CreateTodoResult(TodoIdだけ返す、とか) - Entityをそのまま返さない(読みモデルやAPIに漏れやすいから)🚫
3) 命名ルールを決めると、脳みそが節約できる🧠💡
おすすめの固定ルール(めっちゃ効く!)👇
- Request:
XxxRequest - Response:
XxxResponse - Command:
XxxCommand - Query:
XxxQuery - Handler:
XxxHandler - Result:
XxxResult
これだけで「次どこ作るんだっけ?」が激減するよ😺✨
4) 実装例:ToDo(Create / Update / GetList)を“テンプレ化”する🛠️🧩
ここからは Minimal API版 で見せるね!(Controller版も後で出すよ👍)
4-1. フォルダの置き場所(例)📁
Api/Features/Todos/(エンドポイントとAPIのDTO)Application/Features/Todos/(Command/Query/Handler/Result)Infrastructure/(DBとか)
4-2. DTOたち(Request/Response と Command/Query/Result)📦✨
// Api/Features/Todos/Contracts.cs
namespace Api.Features.Todos;

public sealed record CreateTodoRequest(string Title, DateOnly? DueDate);
public sealed record UpdateTodoRequest(string Title, DateOnly? DueDate, bool IsDone);

public sealed record CreateTodoResponse(Guid TodoId);

public sealed record TodoListItemResponse(
    Guid TodoId,
    string Title,
    DateOnly? DueDate,
    bool IsDone
);

public sealed record PagedResponse<T>(
    IReadOnlyList<T> Items,
    int Page,
    int PageSize,
    int TotalCount
);
// Application/Features/Todos/Messages.cs
namespace Application.Features.Todos;

public sealed record CreateTodoCommand(string Title, DateOnly? DueDate);
public sealed record UpdateTodoCommand(Guid TodoId, string Title, DateOnly? DueDate, bool IsDone);

public sealed record GetTodoListQuery(string? Search, int Page, int PageSize);

public sealed record CreateTodoResult(Guid TodoId);
public sealed record TodoListItemDto(Guid TodoId, string Title, DateOnly? DueDate, bool IsDone);

public sealed record PagedResult<T>(
    IReadOnlyList<T> Items,
    int Page,
    int PageSize,
    int TotalCount
);
4-3. Handler(ここが“仕事する場所”🍳🔥)
※DB実装は章が進むともっと良くするけど、ここでは「形」を優先してOK👍
// Application/Features/Todos/Handlers.cs
namespace Application.Features.Todos;

public interface ICreateTodoHandler
{
    Task<CreateTodoResult> Handle(CreateTodoCommand command, CancellationToken ct);
}

public interface IUpdateTodoHandler
{
    Task<bool> Handle(UpdateTodoCommand command, CancellationToken ct); // true=更新できた
}

public interface IGetTodoListHandler
{
    Task<PagedResult<TodoListItemDto>> Handle(GetTodoListQuery query, CancellationToken ct);
}
4-4. エンドポイント(APIは“薄く”!3〜7行くらいが理想🧼✨)
ここが第23章のメイン!🎯 入力→変換→Handler→返す を絶対に崩さないよ💪
// Api/Features/Todos/TodosEndpoints.cs
using Application.Features.Todos;
using Microsoft.AspNetCore.Mvc;

namespace Api.Features.Todos;

public static class TodosEndpoints
{
    public static RouteGroupBuilder MapTodos(this IEndpointRouteBuilder app)
    {
        var group = app.MapGroup("/api/todos")
            .WithTags("Todos");

        group.MapPost("/", Create);
        group.MapPut("/{todoId:guid}", Update);
        group.MapGet("/", GetList);

        return group;
    }

    private static async Task<IResult> Create(
        [FromBody] CreateTodoRequest request,
        ICreateTodoHandler handler,
        CancellationToken ct)
    {
        // 1) 入力 → 2) Commandに変換
        var command = new CreateTodoCommand(request.Title, request.DueDate);

        // 3) Handler実行
        var result = await handler.Handle(command, ct);

        // 4) Responseに変換して返す
        var response = new CreateTodoResponse(result.TodoId);

        return Results.Created($"/api/todos/{response.TodoId}", response);
    }

    private static async Task<IResult> Update(
        Guid todoId,
        [FromBody] UpdateTodoRequest request,
        IUpdateTodoHandler handler,
        CancellationToken ct)
    {
        var command = new UpdateTodoCommand(todoId, request.Title, request.DueDate, request.IsDone);

        var updated = await handler.Handle(command, ct);
        return updated ? Results.NoContent() : Results.NotFound();
    }

    private static async Task<IResult> GetList(
        string? search,
        int page,
        int pageSize,
        IGetTodoListHandler handler,
        CancellationToken ct)
    {
        var query = new GetTodoListQuery(search, page <= 0 ? 1 : page, pageSize <= 0 ? 20 : pageSize);

        var result = await handler.Handle(query, ct);

        var response = new PagedResponse<TodoListItemResponse>(
            result.Items.Select(x => new TodoListItemResponse(x.TodoId, x.Title, x.DueDate, x.IsDone)).ToList(),
            result.Page,
            result.PageSize,
            result.TotalCount
        );

        return Results.Ok(response);
    }
}
✅ポイント(めっちゃ大事)🧠✨
- APIはロジックしない(if地獄になりやすい)😇
- 変換はAPI内にあってOK(ただし薄く!)
- Handlerは“ユースケースの正しい場所”(業務ルールもここ寄り)🏛️
5) エラーも“型”を揃えるとAPIがキレイになる🧯✨
APIが増えると、エラー形式がバラバラで苦しくなるよね😵 ASP.NET Coreは ProblemDetails を標準で扱える流れが用意されてるよ。(Microsoft Learn)
例えば、全体としてProblemDetailsを使いやすくする設定イメージ👇
// Program.cs(例)
var builder = WebApplication.CreateBuilder(args);

builder.Services.AddProblemDetails(); // ProblemDetails生成サービス
var app = builder.Build();

app.UseExceptionHandler();
app.UseStatusCodePages();

app.MapTodos();

app.Run();
「業務エラー vs 技術エラー」の分け方は第27章でガッツリやるよ🧯✨ (ここでは“形式を揃えられる”って感覚だけ持てればOK!)
6) Controller版の“薄い形”も出しておくね📮✨
Minimal APIじゃなくControllerでも、やることは同じ! (Controllerが太る問題は第22章の続きでここでも効くよ〜👑💦)
using Application.Features.Todos;
using Microsoft.AspNetCore.Mvc;

namespace Api.Features.Todos;

[ApiController]
[Route("api/todos")]
public sealed class TodosController : ControllerBase
{
    [HttpPost]
    public async Task<IActionResult> Create(
        [FromBody] CreateTodoRequest request,
        [FromServices] ICreateTodoHandler handler,
        CancellationToken ct)
    {
        var command = new CreateTodoCommand(request.Title, request.DueDate);
        var result = await handler.Handle(command, ct);

        var response = new CreateTodoResponse(result.TodoId);
        return Created($"/api/todos/{response.TodoId}", response);
    }
}
7) コピペ用テンプレ(Create / Update / GetList)📌🧩
✅ Create(201 Created)
// 1) request → 2) command → 3) handler → 4) response
var command = new XxxCommand(...);
var result = await handler.Handle(command, ct);
var response = new XxxResponse(...);
return Results.Created($"/api/xxx/{response.Id}", response);
✅ Update(204 NoContent / 404 NotFound)
var command = new UpdateXxxCommand(id, ...);
var updated = await handler.Handle(command, ct);
return updated ? Results.NoContent() : Results.NotFound();
✅ GetList(200 OK + ページング)
var query = new GetXxxListQuery(search, page, pageSize);
var result = await handler.Handle(query, ct);
var response = new PagedResponse<XxxItemResponse>(...);
return Results.Ok(response);
8) AI(Copilot / Codex)活用プロンプト例🤖💖
DTO生成(命名も揃える)
- 「ToDoのCreate/Update/GetList用に、Request/Response/Command/Query/Resultをrecordで作って。命名はXxxRequest/XxxCommand/XxxResultで統一して」
エンドポイントの薄さチェック👀
- 「このエンドポイントが薄いかレビューして。API層に業務ルールやSQLが混ざってたら指摘して」
“変換を関数化”する提案
- 「request→command、dto→response の変換を extension method に切り出して薄くして」
※AIが作ったコードは、最後に必ずここだけ確認してね👇
- APIに業務ルールが入ってない?
- Entityをそのまま返してない?
- **例外握りつぶしてない?**🙈
9) ミニ演習(15〜30分)⏱️🐣
ToDoに「タグ機能」を追加してみよ〜!🏷️✨
POST /api/todos/{id}/tags(Command)GET /api/todos/tags(Query:タグ一覧)- ルール:APIは変換してHandler呼ぶだけを崩さない😺🧩
10) まとめ🎀
この章のゴールはこれ👇 「新しい機能を追加しても、毎回同じ形で増やせる」✨
- 入力(Request)→ 依頼書(Command/Query)→ 実行(Handler)→ 返す(Response)📦📮🍳📤
- APIを薄く保つと、CQRSの良さ(変更しやすい・テストしやすい)が出やすいよ😊
- Minimal APIの返し方(返せる型・TypedResultsなど)は公式で整理されてるから、迷ったらそこに戻ると安心!(Microsoft Learn)
次の第24章では、この流れをさらに気持ちよくするために Dispatcher(小さなMediator) を自作して「仕組みそのもの」を理解していくよ〜📬✨