第12章:Decorator:機能を“重ねる”合成テク🎂✨
この章のゴールはシンプルだよ😊 **「元のクラスをいじらずに、ログ・リトライ・計測みたいな機能を“外側から”足せる」**を体験すること!🧁🧁
1) Decoratorってなに?一言でいうと…🎁
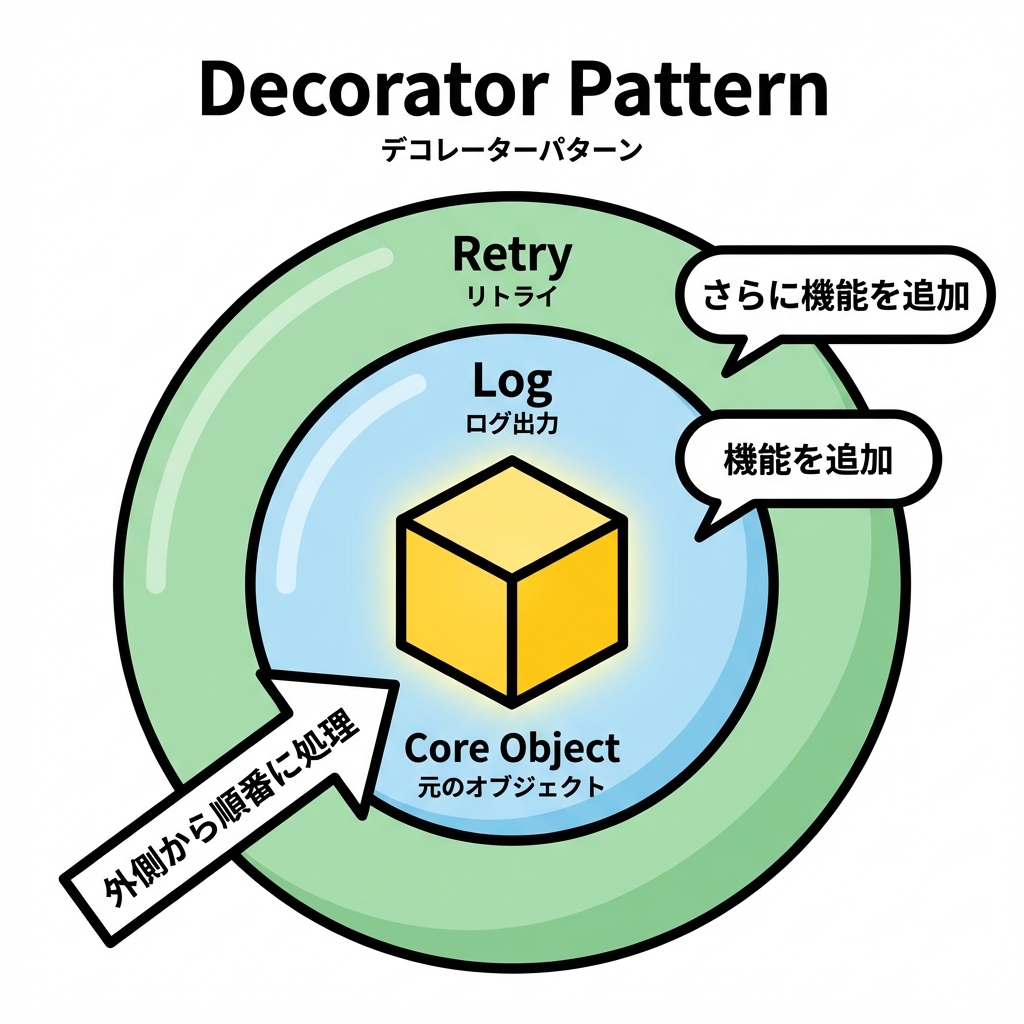
**「同じインターフェースの“包み紙”で、機能を足しながらくるむ」**パターンだよ🎀
- ✅ 元のクラス(本体)を変更しない
- ✅ 機能を“レイヤー”として積める(ログ→リトライ→計測…)
- ✅ 継承で「Logging版」「Retry版」みたいに派生を増やさない🌳❌
イメージ図👇(レイヤー重ね)
RetryDecorator( LoggingDecorator( CoreService ) ) 🎂✨
2) 今日の題材:通知送信サービス📩✨
今回は「通知を送る」だけのサービスに、ログ📝 と リトライ🔁 を“重ねる”よ!
Step0:まずは素のサービス(本体)🧱
public interface INotifier
{
    Task NotifyAsync(string userId, string message, CancellationToken ct = default);
}

public sealed class EmailNotifier : INotifier
{
    public async Task NotifyAsync(string userId, string message, CancellationToken ct = default)
    {
        // 例:実際はSMTPや外部APIなど
        await Task.Delay(50, ct);

        // たまに失敗する想定(デモ用)
        if (Random.Shared.Next(1, 5) == 1)
            throw new HttpRequestException("Mail gateway temporary failure");

        Console.WriteLine($"[EMAIL] to={userId} msg={message}");
    }
}
3) Decoratorの基本形:同じIFを実装して“中身”を持つ🧩
Decoratorはだいたいこの形👇
- 自分も
INotifierを実装する(利用側から見たら同じ) - 中に
INotifier(本体orさらに内側のDecorator)を持つ - 前後に処理を挟んで、中身へ委譲する
4) ログDecorator:触らずにログだけ足す📝✨
public sealed class LoggingNotifierDecorator : INotifier
{
    private readonly INotifier _inner;

    public LoggingNotifierDecorator(INotifier inner)
        => _inner = inner;

    public async Task NotifyAsync(string userId, string message, CancellationToken ct = default)
    {
        Console.WriteLine($"[LOG] Notify start user={userId}");
        try
        {
            await _inner.NotifyAsync(userId, message, ct);
            Console.WriteLine($"[LOG] Notify success user={userId}");
        }
        catch (Exception ex)
        {
            Console.WriteLine($"[LOG] Notify failed user={userId} ex={ex.GetType().Name}: {ex.Message}");
            throw;
        }
    }
}
✅ ポイント
- 本体
EmailNotifierは一切変更なし!🧼 - “前後”に処理を足せた!🎉
5) リトライDecorator:失敗したらもう一回!🔁🔥
ここは超大事⚠️ 何でもリトライして良いわけじゃないよ(後でまとめるね)🙂
まずは「一時的な失敗」っぽい例外だけ、最大3回までリトライにする!
public sealed class RetryNotifierDecorator : INotifier
{
    private readonly INotifier _inner;
    private readonly int _maxRetries;
    private readonly TimeSpan _baseDelay;

    public RetryNotifierDecorator(INotifier inner, int maxRetries = 3, TimeSpan? baseDelay = null)
    {
        _inner = inner;
        _maxRetries = maxRetries;
        _baseDelay = baseDelay ?? TimeSpan.FromMilliseconds(200);
    }

    public async Task NotifyAsync(string userId, string message, CancellationToken ct = default)
    {
        int attempt = 0;

        while (true)
        {
            attempt++;
            try
            {
                await _inner.NotifyAsync(userId, message, ct);
                return;
            }
            catch (HttpRequestException) when (attempt <= _maxRetries)
            {
                // ざっくり指数バックオフ(200ms, 400ms, 800ms…)
                var delay = TimeSpan.FromMilliseconds(_baseDelay.TotalMilliseconds * Math.Pow(2, attempt - 1));

                Console.WriteLine($"[RETRY] attempt={attempt}/{_maxRetries} delay={delay.TotalMilliseconds:0}ms");
                await Task.Delay(delay, ct);
                continue;
            }
        }
    }
}
6) 2段重ね:ログ → リトライ(または逆)🧁🧁
「順番」めっちゃ大事!🎯 どっちが正しいかは目的によるよ🙂
パターンA:外がログ、内がリトライ(ログがスッキリ)✨
- ログは「最終結果」中心になりやすい
- リトライの細かい試行ログは別途出すならOK
INotifier core = new EmailNotifier();
INotifier notifier = new LoggingNotifierDecorator(
                        new RetryNotifierDecorator(core));

await notifier.NotifyAsync("user-1", "Hello!", CancellationToken.None);
パターンB:外がリトライ、内がログ(試行ごとにログが出る)📝📝📝
- “各試行”がログに出る(監視したい時はこっち)
INotifier core = new EmailNotifier();
INotifier notifier = new RetryNotifierDecorator(
                        new LoggingNotifierDecorator(core));

await notifier.NotifyAsync("user-1", "Hello!", CancellationToken.None);
7) よくある使いどころ(現場っぽいやつ)🏢✨
Decoratorが刺さるのは、こういう横断関心(どこでも欲しいやつ)!
- ログ📝
- リトライ🔁(一時障害だけ)
- タイムアウト⏳
- 計測(時間/回数)⏱️
- キャッシュ🗃️
- 権限チェック🔐
8) “リトライしていい?”の判断メモ🧠⚠️
リトライは便利だけど、雑にやると事故る😇
-
✅ GET的な「読取」や、**同じ操作を繰り返しても安全(冪等)**な処理は比較的OK
-
⚠️ 「課金」「注文確定」みたいな二重実行が致命傷な処理は要注意
- 対策:冪等キー、重複防止、サーバ側の一意制約など(第16章にも繋がるよ)🧷
9) 依存の組み立て(Composition Root)でやるのがキレイ🌳🧩
Decoratorは「newの順番」が命なので、組み立て場所を1か所に集めるのが相性◎
10) DIでDecoratorを扱うときの現実解🧰
標準DIは素直で良いけど、“Decorate”の専用APIは標準では用意されてない(追加提案は昔から議論されてる)📝 (GitHub) なので現場ではだいたい👇のどれか!
A) 手動で組む(小規模なら最強に分かりやすい)💪
(さっきの new 連結)
B) Scrutorを使う(定番)🧩
Scrutorは IServiceCollection に Decorate を足してくれるよ🧁 (GitHub)
using Microsoft.Extensions.DependencyInjection;
using Scrutor;

var services = new ServiceCollection();

services.AddSingleton<INotifier, EmailNotifier>();
services.Decorate<INotifier, LoggingNotifierDecorator>();
services.Decorate<INotifier>(inner => new RetryNotifierDecorator(inner, maxRetries: 3));

var provider = services.BuildServiceProvider();

var notifier = provider.GetRequiredService<INotifier>();
await notifier.NotifyAsync("user-1", "Hello!", CancellationToken.None);
💡注意:Decorateは「先に登録されたサービス」を包むので、登録順が大事だよ🧠 (GitHub)
11) .NETの世界にも“Decoratorっぽい鎖”は普通にあるよ🔗
「あ、これDecoratorと同じ発想だ!」って気づけると強い✨
- ASP.NET Coreのミドルウェア:リクエストが順番に流れるパイプライン🚰 (Microsoft Learn)
- IHttpClientFactory の DelegatingHandler:外向きHTTPに“外側から機能を足す”仕組み(DIでHandlerを解決する話もあるよ)🌐 (Microsoft Learn)
- さらに最近は Microsoft.Extensions.Http.Resilience で、HttpClientに回復性(リトライ等)を組み込みやすくなってる📦✨ (Microsoft Learn)
(.NET 10はLTSで、2026-01-13時点の最新パッチは10.0.2、サポートは2028-11-14までだよ)📅 (Microsoft)
12) ハンズオン課題(15〜25分)🧪✨
課題A:計測Decoratorを追加しよう⏱️
StopwatchでNotifyAsyncの時間を測ってログに出す- 例:
[TIME] 37ms
課題B:3段重ねを試そう🎂🎂🎂
- 計測 → ログ → リトライ(順番を変えて、出力がどう変わるか観察👀)
課題C:例外の種類でリトライ対象を絞ろう🎯
HttpRequestExceptionはリトライArgumentExceptionは即失敗(バグっぽいから)💥
13) AI活用(コピペでOK)🤖💬
- 「
INotifierのDecorator雛形を3種類(Logging/Retry/Timing)で作って。各Decoratorは“責務が混ざらない”ようにして」 - 「リトライの“対象にしてはいけない操作”の判断基準を、C#の例つきで短くまとめて」
- 「このDecoratorの順番(A→B→C)だとログはどう出る?目的別におすすめ順を提案して」
まとめ🎀
Decoratorは、合成優先の中でも特に強い武器だよ🧁✨ **「機能を足したい。でも本体は触りたくない」**ってときに、迷わず候補にできるようになると一気に設計が楽になる😊
次の章(Adapter)では「外部の都合を中に入れない」方向で、また“包む”を別の角度からやっていくよ🔧🧼